A few years ago, I wrote a blog post showing how to track aMember sales in Google Universal Analytics “Enhanced Ecommerce” using Google Tag Manager.
Well, Google Analytics Version 4 (known as GA4) is now out of beta, and I’ve started migrating my aMember sites tracking to use GA4.
This article shows a clean install of GA4 purchase tracking with aMember.
If you want to run UA and GA4 in parallel, I recommend this article from Simo Avaha.
Anyhow, here’s how I’m doing it on my sites, using aMember’s own Conversion Track plugin.
Table of Contents
Step 1: Push the dataLayer using the Conversion Track plugin
NB: If you don’t have Conversion Track, you can order it from the “Addons Shop” in your aMember account.
aMember’s Conversion Track Plugin lets you track customer’s first ever purchase separately from subsequent purchases. It’s optional, however, so if you don’t add anything for ‘First Sale Tracking Code’, it will use the main ‘Sale Tracking Code’ for all sales.
With that in mind, below are two versions of the code. If you look carefully, the snippets only vary in the product item_category (“Sale” vs “Initial Sale”).
Here are the two code snippets in full:
Sale Tracking Code
<script>
// Sends transaction data with a pageview (DOM Ready)
window.dataLayer = window.dataLayer || [];
window.dataLayer.push({ ecommerce: null });  // Clear the previous ecommerce object.
window.dataLayer.push({
  event: 'purchase',
  ecommerce: {
      transaction_id: '%payment.transaction_id%', // Required
      affiliation: '%afflogin%',
      value: '%payment.amount%',
      tax:'%payment.tax%',
      shipping: '%payment.shipping%',
      currency: '%payment.currency%',
      coupon: '%invoice.coupon_code%',
      items: [
           // List of items. Name or ID is required.
           %foreach_product%{
           item_id: '%item.item_id%',
           item_name: '%item.item_title%',
           item_category: 'Sale',
           price: '%item.price%',
           quantity: '%item.qty%',
           },%endforeach_product%
       ]
  }
});
</script>
First Sale Tracking Code (Optional)
<script>
// Sends transaction data with a pageview (DOM Ready)
window.dataLayer = window.dataLayer || [];
window.dataLayer.push({ ecommerce: null });  // Clear the previous ecommerce object.
window.dataLayer.push({
  event: 'purchase',
  ecommerce: {
      transaction_id: '%payment.transaction_id%', // Required
      affiliation: '%afflogin%',
      value: '%payment.amount%',
      tax:'%payment.tax%',
      shipping: '%payment.shipping%',
      currency: '%payment.currency%',
      coupon: '%invoice.coupon_code%',
      items: [
           // List of items. Name or ID is required.
           %foreach_product%{
           item_id: '%item.item_id%',
           item_name: '%item.item_title%',
           item_category: 'Initial Sale',
           price: '%item.price%',
           quantity: '%item.qty%',
           },%endforeach_product%
       ]
  }
});
</script>
If you have free products, then you can optionally add this one too:
Free Signup (optional) Code
<script>
// Sends transaction data with a pageview (DOM Ready)
window.dataLayer = window.dataLayer || [];
window.dataLayer.push({ ecommerce: null });  // Clear the previous ecommerce object.
window.dataLayer.push({
  event: 'purchase',
  ecommerce: {
      transaction_id: '%invoice.public_id%', // Required
      affiliation: '%afflogin%',
      value: 0.00,
      tax: 0.00,
      shipping: 0.00,
      currency: '%invoice.currency%',
      coupon: '%invoice.coupon_code%',
      items: [
           // List of items. Name or ID is required.
           %foreach_product%{
           item_id: '%item.item_id%',
           item_name: '%item.item_title%',
           item_category: 'Free Signup',
           price: '%item.price%',
           quantity: '%item.qty%',
           },%endforeach_product%
       ]
  }
});
</script>
With those snippets in place, aMember will post a ‘purchase’ event into the dataLayer whenever a sale is made.
Step 2: Setup the Event Trigger in GTM
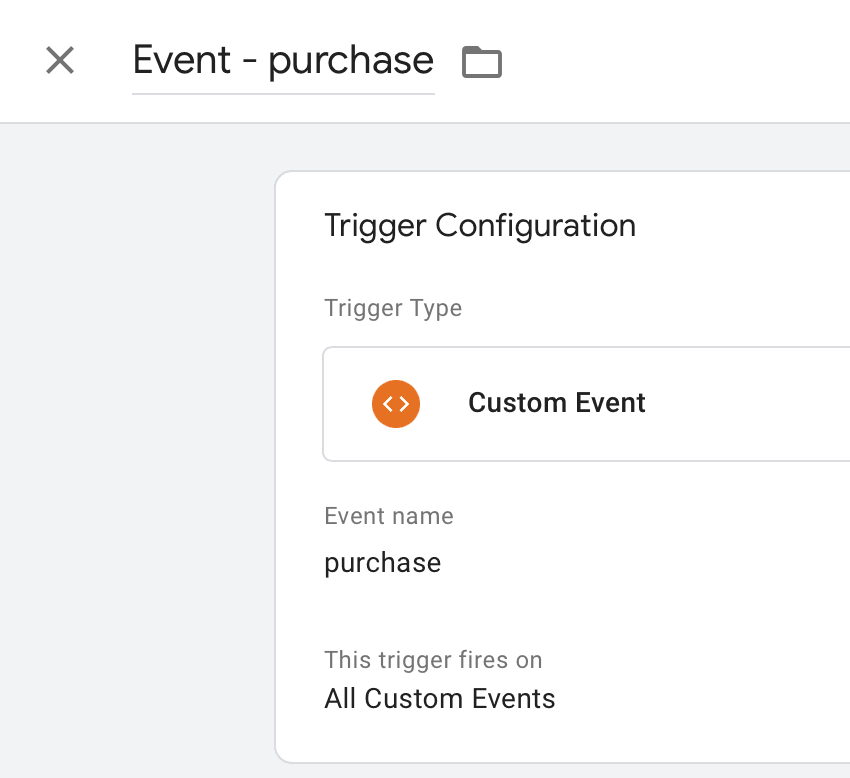
The next task is to add a custom event trigger called “purchase” in your GTM so that it knows what to do when aMember updates the dataLayer with your conversion data.
Here’s what mine looks like:
Step 3: Setup Some GA4 DataLayer Variables
GA4 is still pretty new, so there isn’t (at time of writing) a simple tickbox that allows the GA4 event to go grab the ecommerce dataLayer payload like there is in UA Enhanced Ecommerce.
So there is a little one-time setup to do in GTM to get GA4 purchase tracking working, as explained in the official GA4 documentation for the purchase event.
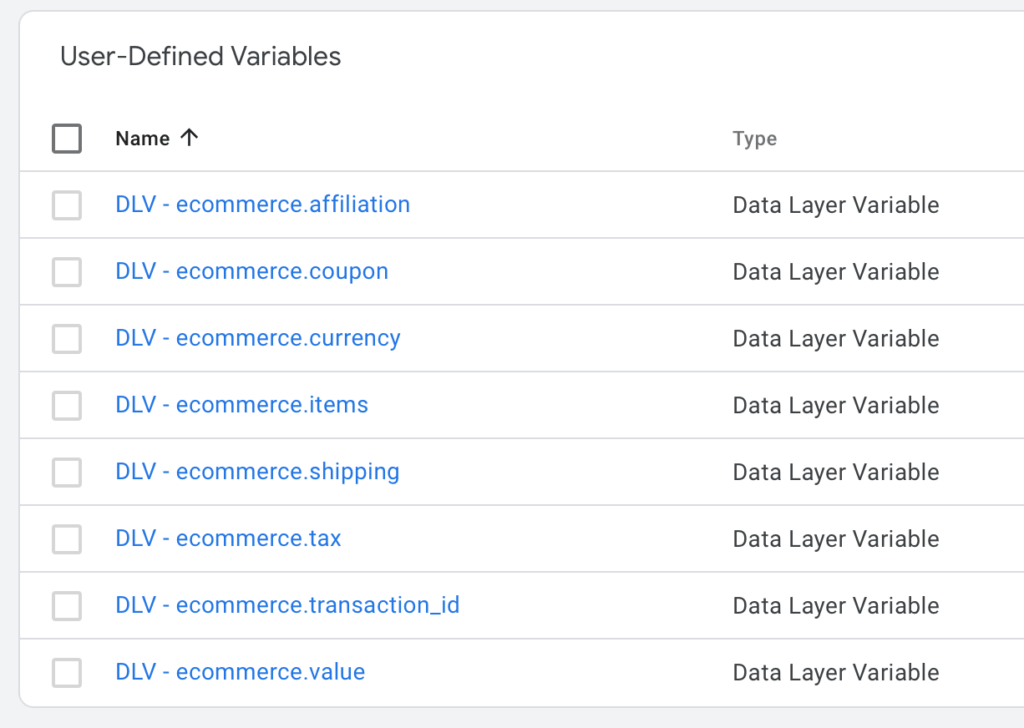
Essentially, we want to create 8 dataLayer variables as follows:
Each variable is setup the same way, as a Version 2 dataLayer variable.
For example, below is what the main ecommerce.items variable looks like in its settings.
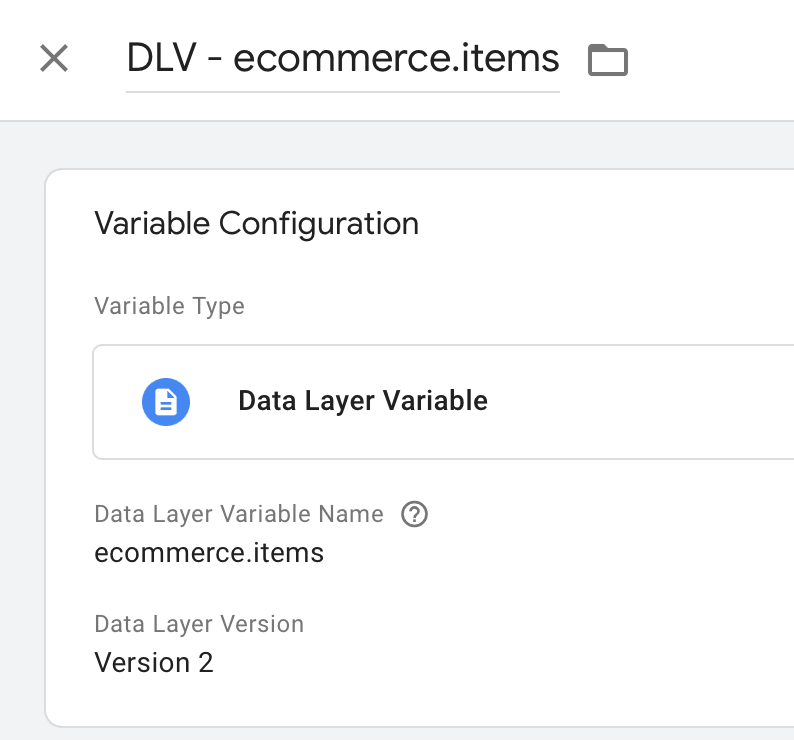
As you can see, for simplicity, I like to name my dataLayer variables as they appear, prefixed with “DLV – “
Now that’s done, we can move on to the final step.
Step 4: Attach a GA4 Event Tag To The Trigger
Am assuming you have already set up a GA4 Configuration Tag, which is the basic GA4 integration with GTM. If not, consult the Google Docs to set yours up.
A GA4 event tag can then be created to track the purchase. As mentioned before, GA4 doesn’t have a dedicated event for ecommerce, so we have to add in the variables we created before.
See the image below for the full setup!
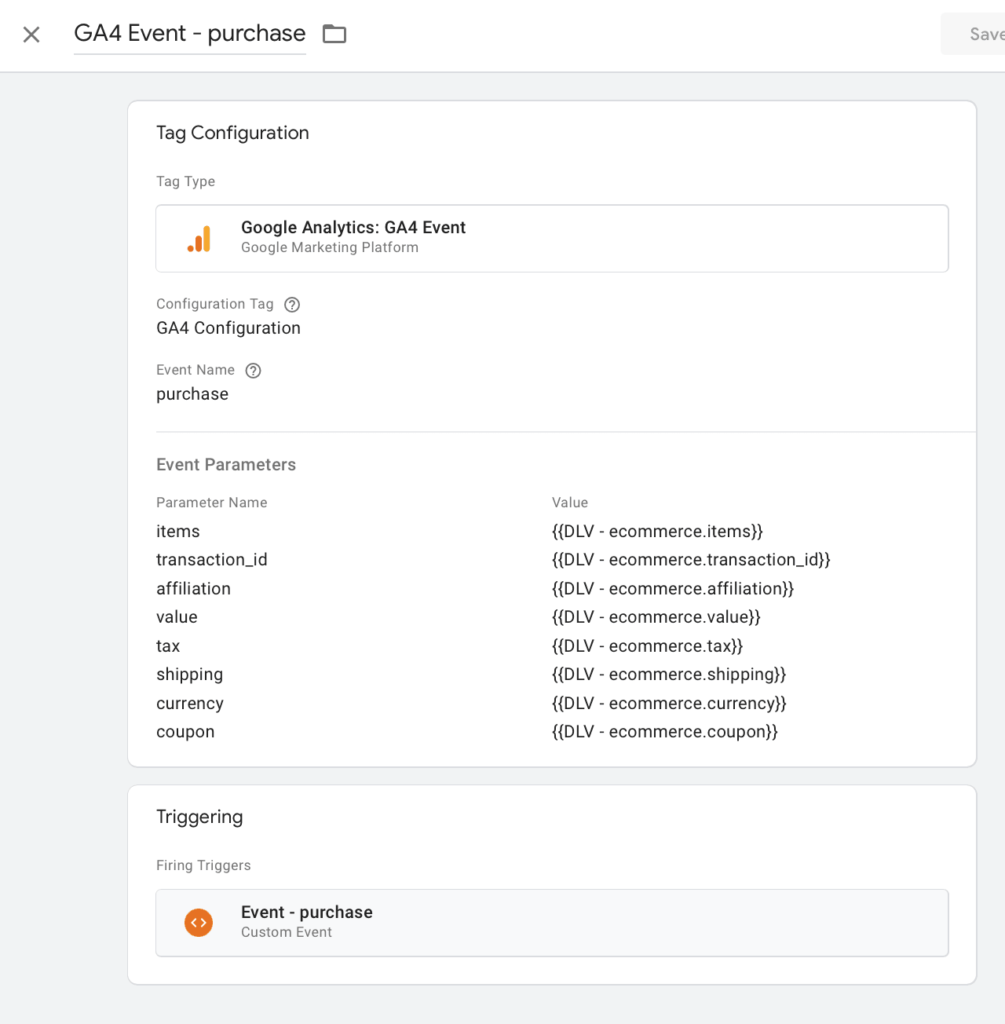
Notice how the GA4 event uses the main GA4 Configuration Tag (mine is called “GA4 Configuration”) – which is essentially the updated version of the old UA Settings Variable.
The event Name MUST be ‘purchase’ for GA4 to treat it as an eCommerce event.
The Event Parameters must be set up as per the image to pass in all the data from the dataLayer that aMember pushed in. Check the official documentation in case this list gets updated.
Finally, set the trigger to the one you created in Step 2.
And that’s it!

